Monthly Archives: March 2014

DIY: Simple Sharpie Silhouette of Your Pet

image

Here is a simple art project that you can make in a matter of minutes once you’ve gathered your supplies. There are many ways to make silhouette line art drawings, and this one is easy and fun! It will look great on a wall near your pet’s sleeping or eating area, also mixed in with a collage of family photos, or on a table near an entry door. I was inspired to draw this rendering of our Toby when I saw these custom pieces of art here.  When I like a piece of art in a magazine, I like to Continue reading

Asian Red Pepper Beef & Mushrooms

20140328-184616.jpg

This Asian Beef dish is delicious and one of my favorites to make because it’s easy and tastes like I just picked it up from our favorite Chinese restaurant. You only need 30 minutes to prepare it. Slicing the meat and peppers thin is key to cooking and getting it on the table quickly.  If you choose to grill the meat, slice it thin just before adding to the cooked vegetables. Another option is to wrap a small portion of the beef mixture in a warm tortilla to eat fajita-style. I warm tortilla’s individually in the microwave for 12-15 seconds at the same time I call family to the dinner table.

Asian Red Pepper Beef & Mushrooms


Soy sauce mix
4 tablespoons soy sauce
4 tablespoons red cooking wine
3 tablespoons of sugar
4 teaspoons of rice vinegar
1/2 – 1 teaspoon red pepper flakes (to your taste)
1 teaspoon corn starch

Beef & Vegetables
1 tablespoon plus one tsp of vegetable oil
3/4 pound boneless New York Strip steak, thinly sliced (optional: use a tenderizer mallot before slicing)
1 large (or 2 small) red bell pepper, ribs and seeds removed, thinly sliced
3 garlic cloves minced
cooked rice for serving
thinly sliced scallions or green onions for serving (optional)

In a small bowl, combine soy sauce, sherry, sugar, vinegar, red-pepper flakes, and cornstarch. In a large skillet, heat 1 tablespoon oil over medium-high. In two batches, cook meat, undisturbed, until browned on one side, about 2 minutes per batch. Transfer to a plate. Add 1 teaspoon oil and mushrooms to skillet and cook 2 minutes. Add bell peppers to mushrooms, stirring until peppers are crisp-tender, 2 minutes. Add garlic and cook until fragrant, 30 seconds. Whisk soy sauce mixture and add to skillet along with steak. Cook, stirring until sauce thickents, 1 minute.  To serve, spoon beef mixture over rice and top with scallions or green onions if desired.

Lisa

Homemade Chicken Potpie & Creamy Chicken and Noodles

Find the recipe here and helpful video!

Easy to make in a 9″ pie shell or as mini pies like the one pictured here.

Here is a great how-to make homemade chicken potpie video you can view at the link below. I’m on a comfort food kick since the weather is still too cold to grill outdoors. Be sure to pick up a roasted chicken from your grocer and dice up the breasts to make this potpie even easier to prepare.

Chicken Potpie recipe link: http://allrecipes.com/recipe/chicken-pot-pie-ix/detail.aspx?src=VD_Summary.

Creamy Chicken & Noodles


Diced leftover cooked chicken
2 packages of Old-Fashioned Noodles (I used Inn Made Wide Noodles)
1 cup each: diced carrots, celery & onions
1 cup frozen peas (optional)
1/4 cup oil
favorite soup spices on hand
2 tablespoons creamy chicken base (Gordon Foods has great bases.)

Saute onions, carrots, celery in oil until slightly softened. Add your favorite spices (I add a pinch of red pepper, and a dash of onion powder, garlic powder, along with a liberal amount of thyme, basil or a favorite Italian spice.)

Once the vegetables are carmelized, add 2 tablespoons creamy chicken base, and 6 – 8 cups of water. Bring to a boil. Taste the broth, add a small amount of base if needed.

Add the old-fashioned noodles, peas and cooked chicken and simmer. The flour in the noodles will thicken the broth. Once the noodles are cooked turn off the stove and allow the pot to rest. The longer it rests the creamier and less broth you will have.

I hope you find these meals fairly easy and a pleasure to make. Don’t forget to sign up to receive Modern Hen Home posts in your mailbox and also Like my page on Facebook and then share. Have a blessed day!

image

How To Hand Paint A Lettered Sign

20140326-173309.jpg

I love graphic signs, don’t you? They say so much about who we are or what we hope for each day.

They are good reminders…

… and can show off a family’s personality with just a few words on display for all who pass by to see.

The sticky vinyl ones you can buy at a craft store, or custom order online, are so very cool… until they need to be temporarily moved from the wall.

Like that time I needed to repaint the kitchen and my big, pretty scrolled words above the sink along the soffit had to go. Remembering how much I paid for it originally made the job of removing and discarding it that much more painful.

I cried giant crocodile tears that day.

And decided… I won’t pay that much again. 

20140326-173801.jpg
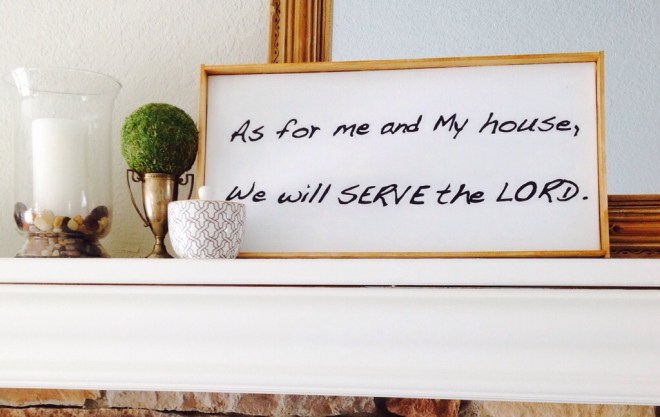
Now my new sign is much more modest in size and less fancy…

…and I like that it can be moved from room-to-room when I choose.

And this easy tutorial helped me figure out how to make it before getting started:  how-to hand paint letters.

There are two options for transferring letters to your board or canvas… I chose the pencil shading technique (chalk was the other option).  After lightly tracing each words on the canvas, simply fill them in with acrylic paint.

A curvy font or type is more forgiving for those of us with a less steady hand who tend to color outside of the lines a bit.  It may help to print words as a sample in a few sizes to decide which one fits your canvas best.

To frame, I purchased thin slat wood from Lowe’s, measured and cut it with a mitre saw, stained it with polyurethane and allowed it to dry overnight. Once dry I tapped it together around the canvas with finishing nails.

Have fun!

Lisa

DIY White Heron Painting Inspired by Ballard Designs

image


Last winter I was motivated to try my hand at recreating a colorful heron painting like the one shown here from Ballard Designs. It’s a large print giclee on canvas and the blend of paint colors and whole scene remind me of Florida and summertime.

Winters can be long in Michigan, and this painting project helped with all the snow days spent indoors. I sketched the bird, trees and foliage as a guide to painting each area, then layered and mixed a variety of acrylic paints to get the colors I liked. To frame it, I stained wood strips from Lowes and nailed them to the canvas to mimic the inspiration piece.

This was a fun art project and not too difficult to do. I worked on it here and there over a few weeks when I had time to spare. If I made a color choice I didn’t care for, I just painted over it and began again. I sealed it and gave it a slightly glossy shine with a clear glaze.

How about you, do you paint, craft, and work on DIY projects? Do you enjoy recreating affordable inspiration art for your home? Please share with me by leaving a comment.

image


I Love My Dog…{And Why I’m Thankful for Pet Insurance}

Picture 5

Okay, he’s not just my dog… Toby is our family dog.

And we adore him.

Our miniature schnauzer is 2-1/2 years old and we fell in love the moment we held him in our arms at just 8 weeks old.  He is special to us for many reasons…

He is our sons’ first dog.

He makes us smile and laugh every single day.

Mornings are like a holiday when Toby meets us at the bottom of the staircase, or at the door after a long day. He greets us with squeals and jumps and demands for hugs and rub downs before we get two steps by him.

He never fails to lavish us with love.

And we didn’t think we would have him for long. Continue reading

%d bloggers like this: